Transform your walls into captivating masterpieces with the vibrant artistry of washi tape. This comprehensive guide walks you through every step, from planning your design to applying the final touches, enabling you to create a stunning washi tape wall mural that reflects your unique style.
Discover the diverse possibilities of washi tape, from its versatile colors and textures to its ability to accommodate various design preferences. Learn about essential tools, preparation techniques, and troubleshooting tips to ensure a seamless and successful mural-making experience. This detailed approach will help you create a beautiful and personalized work of art that will surely be the focal point of your space.
Introduction to Washi Tape Wall Murals
A washi tape wall mural is a decorative artwork created by arranging and adhering various pieces of washi tape onto a wall surface. It offers a unique and customizable way to personalize a space, from adding subtle accents to bold statements. This technique is particularly appealing due to its versatility, allowing for a wide array of designs and aesthetics.The beauty of washi tape murals lies in their adaptability.
Different types of washi tape can be used to achieve various looks, from smooth and minimalist to textured and intricate. The variety in colors, patterns, and widths allows for the expression of individual creativity and design preferences. Proper selection of materials is key to a successful and lasting mural.
Types of Washi Tapes Suitable for Murals
Washi tape comes in a wide range of colors, patterns, and textures. For wall murals, choosing the right type is crucial for aesthetic appeal and durability. Consider factors like the desired look, the wall’s surface, and the intended longevity of the mural when selecting your tape. Variations in tape widths, from narrow stripes to wider panels, also affect the overall design.
Essential Tools for Creating a Washi Tape Wall Mural
Several tools are essential for a successful washi tape wall mural project. Accurate measurements are paramount for achieving a well-defined and visually appealing design. Sharp scissors or craft knives are needed for precise cutting of the tape. A good quality adhesive or mounting solution is also necessary to secure the tape to the wall surface without compromising the aesthetic integrity of the mural.
Washi Tape Characteristics and Use Cases
| Tape Type | Characteristics | Colors/Patterns | Use Cases |
|---|---|---|---|
| Metallic Washi Tape | Shiny, reflective surface, often with a metallic sheen. | Gold, silver, copper, rose gold, and other metallic tones. | Adding a touch of elegance, highlighting specific design elements, or creating a modern aesthetic. |
| Textured Washi Tape | Has a raised or embossed surface, offering a tactile element to the mural. | Solid colors or patterned designs, often with intricate details. | Creating depth and visual interest in the mural, complementing the texture of the wall, or adding a 3-D element. |
| Printed Washi Tape | Comes with pre-printed designs, patterns, or images. | Wide range of designs, from nature scenes to abstract patterns, and more. | Creating a pre-designed mural, incorporating a theme or motif into the design, or implementing pre-existing patterns. |
| Solid Color Washi Tape | Provides a clean and simple look. | Various shades and hues for a versatile color palette. | Creating geometric patterns, filling spaces with color, or accentuating other elements of the mural. |
Planning Your Mural Design

A well-planned design is crucial for a successful washi tape wall mural. Careful consideration of the design, its suitability for the chosen wall space, and a clear layout prevent frustration and ensure a visually appealing and lasting result. This stage involves translating your vision into a practical, manageable plan.Thorough planning ensures the mural seamlessly integrates with the existing décor and effectively utilizes the available wall space.
It minimizes wasted washi tape and helps you achieve a cohesive and balanced aesthetic. It’s an essential step for both beginners and experienced muralists.
Importance of Pre-Planning
Careful planning is paramount to a successful washi tape wall mural. It prevents costly mistakes, wasted materials, and ensures a final product that truly reflects your vision. This stage is about visualizing the design in its final form before the application begins. It’s the difference between a haphazard creation and a well-executed artistic masterpiece.
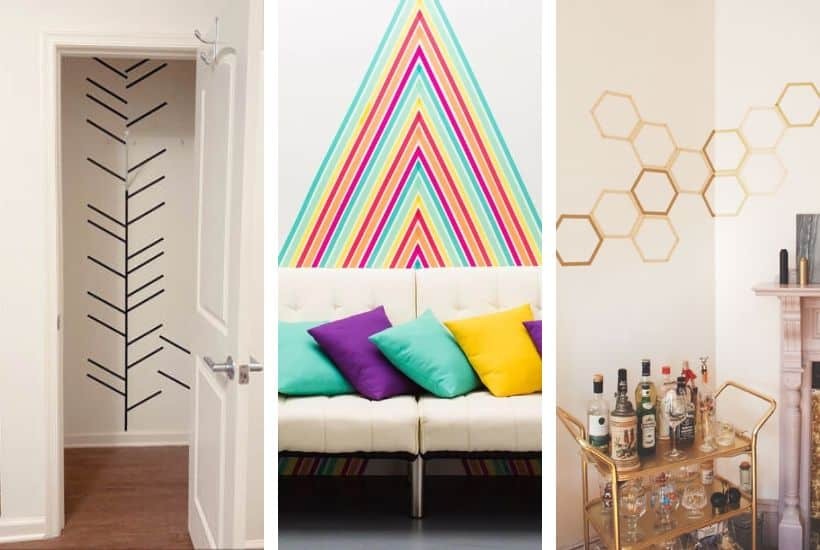
Design Ideas for Washi Tape Murals
A wide array of design ideas can be implemented in a washi tape wall mural. From geometric patterns to nature-inspired designs, the possibilities are vast. Abstract art is another excellent option, offering the freedom to experiment with colors and shapes. The choice depends on personal preference and the desired ambiance for the space.
Design Styles, Examples, and Suitable Wall Locations
| Style | Examples | Wall Location | Considerations |
|---|---|---|---|
| Geometric Patterns | Stripes, grids, triangles, squares, or more complex tessellations. | Living rooms, hallways, or spaces with a modern or minimalist aesthetic. | Consider the scale of the pattern relative to the wall size. Intricate patterns might be overwhelming in a small space. |
| Nature-Inspired Designs | Flowers, leaves, trees, or landscapes. Can include abstract interpretations of nature. | Bedrooms, nurseries, or living rooms with a calming or serene vibe. | Ensure the colors and style complement the existing room décor. Choose images that are easily translatable to washi tape. |
| Abstract Art | Abstract shapes, colors, and textures. May include elements of geometric patterns. | Living rooms, dining rooms, or spaces with a contemporary or eclectic aesthetic. | Abstract designs can be bold and striking, so consider the overall color palette and tone of the room. |
| Floral Patterns | Various arrangements of flowers and leaves. | Bedrooms, living rooms, or any room that could benefit from a touch of vibrancy and charm. | Consider the type of flower and the color scheme to create a cohesive look. |
Translating Design into a Layout
Once a design is chosen, it must be translated into a practical layout suitable for the chosen wall space. This involves determining the best arrangement of colors, shapes, and patterns to maximize visual appeal and space utilization. A well-considered layout is crucial for a harmonious and balanced mural.
Creating a Rough Draft
A rough draft or sketch is an essential step. This serves as a preliminary visual representation of the design, allowing for adjustments and modifications before committing to the actual mural. This paper sketch should include all important elements such as the shapes, sizes, colors, and placement of the washi tape. Use graph paper for a more precise layout.
Preparing the Wall Surface
A meticulously prepared wall surface is crucial for a successful washi tape mural. Proper preparation ensures the tape adheres reliably, preventing peeling and ensuring a long-lasting, beautiful result. This section details the essential steps to prepare your wall, regardless of its type or condition.Thorough cleaning and preparation of the wall is paramount. Dirt, dust, and other debris can compromise the tape’s adhesion, leading to unsightly imperfections.
This section provides guidance on different wall types and the best cleaning methods for each. Understanding how to address different wall textures is also essential for achieving a flawless mural.
Cleaning and Prepping the Wall
Thorough cleaning of the wall surface is vital for optimal washi tape adhesion. Removing dust, dirt, and loose particles ensures a clean, even surface for the tape to grip. This will improve the overall aesthetic and longevity of the mural. Improper cleaning can lead to uneven adhesion and potential peeling of the tape.
- Dusting and Vacuuming: Begin by dusting the wall with a soft cloth or brush. For larger areas or tougher-to-reach spots, a vacuum cleaner with a brush attachment can be used to remove loose dust and debris.
- Washing the Wall: Use a mild detergent solution (e.g., dish soap mixed with warm water) and a clean sponge or cloth to wash the wall surface. Ensure thorough cleaning, paying attention to corners and crevices. Rinse the wall with clean water to remove any soap residue.
- Removing Loose Paint or Wallpaper: If the wall has loose paint or wallpaper, carefully remove it with a scraper or specialized tools. This step is essential to ensure the tape adheres firmly. Use caution and take necessary precautions to avoid damaging the wall further.
Handling Different Wall Types
Different wall types require varying preparation methods. Understanding the wall’s composition and texture is critical to achieving a successful mural.
- Painted Walls: Painted walls typically require thorough cleaning to remove dust and grime. If the paint is glossy, a gentle cleaning solution is essential to prevent damage. Use a soft cloth and avoid abrasive cleaners. For older paint with a tendency to peel, consider a light sanding to create a smoother surface before application.
- Wallpapered Walls: Before applying washi tape to a wallpapered wall, ensure the wallpaper is clean and free from loose sections. Clean the wallpaper with a damp cloth and mild detergent. Inspect for any signs of moisture or damage. Avoid using harsh chemicals that could damage the wallpaper. If there’s any sign of loose wallpaper, consider a patch or replacement before proceeding.
- Stucco or Concrete Walls: Stucco or concrete walls may require a different approach. A thorough cleaning with a stiff brush and detergent solution is often necessary to remove dust and dirt. Ensure any cracks or holes are filled to prevent uneven tape adhesion. Prime the wall before applying tape, if required, for better results.
Supplies for Wall Preparation
This section Artikels the essential supplies needed for preparing the wall surface for your washi tape mural.
- Soft Cloth or Brush: For dusting and cleaning the wall surface.
- Vacuum Cleaner (Optional): For larger areas or tough-to-reach spots.
- Mild Detergent: For washing the wall (e.g., dish soap).
- Clean Sponge or Cloth: For cleaning and rinsing.
- Scraper (Optional): For removing loose paint or wallpaper.
- Sandpaper (Optional): For smoothing rough surfaces (use with caution).
- Primer (Optional): For uneven or porous surfaces, ensuring better tape adhesion.
- Cleaning Solution (Optional): Specific solutions might be required depending on the wall type and condition. Consult resources on cleaning different wall types for optimal results.
Applying the Washi Tape

Applying washi tape to your wall mural requires precision and care. A methodical approach ensures a clean, professional finish and allows for easy adjustments if needed. Proper application techniques are crucial for achieving the desired aesthetic and avoiding any unwanted issues.Careful application minimizes the risk of wrinkles, bubbles, or uneven adhesion, ensuring a smooth and visually appealing final product.
Understanding the nuances of overlapping, layering, and creating patterns will elevate your mural to a new level of artistry.
Proper Application Technique
A crucial aspect of creating a successful washi tape mural is the proper application technique. Applying the tape straight and smoothly minimizes wrinkles and ensures a uniform finish. Starting with a well-prepared surface is essential, as a smooth wall allows for better adhesion and minimizes the likelihood of the tape lifting or curling. Press the tape firmly but evenly across the surface to remove any air bubbles.
Importance of Overlapping
Overlapping washi tape pieces is essential for creating a seamless and consistent look. This overlapping technique prevents visible gaps and creates a more cohesive, unified design. It’s vital to maintain a consistent overlap throughout the mural for a professional finish. The overlap amount will depend on the desired effect and the washi tape’s width. For instance, a 1-inch overlap for a 1-inch wide tape will create a very tight seam, while a 1/2-inch overlap for the same tape will allow for a more visible seam.
Creating Effects with Washi Tape
Washi tape offers a plethora of creative possibilities. Layering washi tape in various colors or patterns adds depth and dimension to the mural. This can be achieved by applying one color over another, or creating an ombre effect using gradual color changes. Patterns, such as stripes, polka dots, or geometric shapes, can be created by carefully placing and overlapping different washi tape pieces.
Gradients can be achieved by using different shades of the same color or contrasting colors.
Step-by-Step Guide to Applying Washi Tape
- Preparation: Ensure the wall is clean, dry, and free from dust or debris. This is crucial for optimal adhesion.
- Placement: Carefully place the first piece of washi tape, ensuring it’s straight and aligned with the desired design. Press down firmly, but avoid excessive pressure, which can cause wrinkles.
- Overlapping: Apply subsequent pieces, overlapping the previous one by the desired amount. Use a ruler or straight edge to ensure precise alignment, especially for straight lines.
- Smoothing: Using a soft, dry cloth or your fingers, gently smooth out any wrinkles or bubbles from the tape.
- Repeat: Continue this process, applying the washi tape in sections according to the design plan. Maintain consistent overlaps and a uniform look throughout the mural.
- Finishing: Once the entire mural is completed, take a step back to admire your creation and make any final adjustments, such as adding accents or decorative elements.
Design Elements Using Washi Tape
Washi tape can be used to achieve various design elements within a mural. Borders, created by placing a strip of tape around the edges of the mural, define the space and create a framed effect. Fills can be used to create solid color areas or patterns. Accents can be used to highlight specific areas or create focal points.
Finishing Touches and Maintenance

Completing a washi tape wall mural is a rewarding experience, but the final touches and ongoing maintenance are crucial for its longevity and aesthetic appeal. Careful attention to these details ensures the mural remains a cherished piece for years to come. Proper finishing techniques prevent wrinkles, bubbles, and other imperfections, while understanding maintenance strategies ensures the mural retains its vibrant colors and pristine appearance.
Final Steps for Completion
The final steps involve a careful review of the mural to ensure the washi tape is evenly applied and adheres properly. Examine the entire mural for any areas that require adjustments. Any small imperfections can be addressed at this stage using a fine-tipped tool or tweezers to carefully reposition or remove sections. A final inspection will help prevent any unanticipated issues in the future.
Preventing Wrinkles and Bubbles
Wrinkles and bubbles in washi tape can detract from the overall aesthetic appeal of the mural. Several strategies can be employed to minimize these issues. Applying the tape in a gradual, overlapping manner can significantly reduce the chance of wrinkles. Using a smoothing tool, like a credit card or a plastic spatula, can help to press out any trapped air pockets.
Also, working in a cool, controlled environment with minimal humidity can contribute to preventing these imperfections. For very intricate designs, consider using a small, specialized smoothing tool designed for delicate applications.
Achieving a Professional Finish
Achieving a professional-looking finish requires a meticulous approach. Ensuring a consistent application of the washi tape is essential. Matching the color tones and ensuring the tape lines are straight and aligned are important elements in achieving a cohesive and professional-looking design. Employing a light touch when applying the tape and allowing sufficient drying time can help achieve a smoother finish.
Reviewing the entire mural for alignment and consistency will contribute to the professional aesthetic.
Ensuring Mural Longevity and Maintenance
The longevity of a washi tape wall mural depends largely on the proper maintenance strategies. Protecting the mural from direct sunlight and moisture is critical. Frequent exposure to direct sunlight can fade the colors of the washi tape over time. Maintaining a stable temperature and humidity level in the room will further protect the mural. Consider using a clear, protective sealant to further protect the mural from dust, debris, and moisture.
Regular inspection and cleaning will help to maintain the mural’s beauty and prevent premature deterioration.
Maintaining the Mural Over Time
Maintaining a washi tape mural involves a few key strategies. Regular dusting is essential to prevent dust accumulation and to maintain the clean appearance of the mural. Avoid using abrasive cleaning agents or harsh chemicals, as these can damage the washi tape. If necessary, use a soft, dry cloth or a slightly damp, lint-free cloth to gently wipe the surface of the mural.
Regular visual inspections can help to identify and address any potential issues early on, such as minor damage or discoloration. Following these preventative measures can extend the life of the mural significantly.
Troubleshooting and Common Mistakes
Creating a captivating washi tape wall mural can be a rewarding experience, but like any creative endeavor, it’s prone to hiccups. Understanding potential pitfalls and troubleshooting techniques is key to achieving a flawless final product. This section will delve into common mistakes and provide practical solutions to help you navigate any challenges that may arise.Careful preparation and attention to detail are essential for a successful mural.
By anticipating potential issues and knowing how to address them, you can confidently embark on your washi tape artistry.
Identifying and Addressing Non-Adherence Issues
Washi tape, while generally reliable, can sometimes fail to adhere properly to the wall surface. This could be due to factors such as insufficient wall preparation, incompatible wall types, or the use of unsuitable tape. Identifying the root cause is crucial for effective troubleshooting.
- Insufficient Wall Preparation: Ensure the wall is clean, dry, and free from dust, grease, or loose paint. A smooth, clean surface provides optimal adhesion. A damp cloth or specialized wall cleaner can help remove surface contaminants.
- Incompatible Wall Types: Certain wall materials, such as those with textured or uneven surfaces, may not provide a consistent base for the tape. If the wall is exceptionally porous, using a primer or a specialized adhesive may be necessary.
- Incorrect Tape Selection: Some washi tapes are designed for specific surfaces or applications. If the tape is not suited for the wall type, it may not adhere properly. Always consult the manufacturer’s recommendations for optimal results. If using a different type of tape (e.g., craft tape, masking tape), verify its compatibility with the wall surface.
- Incorrect Application Technique: Applying the tape too quickly or not pressing firmly enough can lead to poor adhesion. Ensure even pressure is applied throughout the application process.
Managing Bubbles and Air Pockets
Air pockets trapped beneath the tape can lead to unsightly imperfections in the mural. Prompt identification and resolution are key to maintaining a visually appealing final product.
- Immediate Action: As soon as a bubble is noticed, gently use a soft, flat tool (like a credit card or a plastic scraper) to press out the air from beneath the tape. Work slowly and steadily, avoiding creating further wrinkles or damage.
- Precise Removal: If the bubble is persistent, carefully remove the affected section of tape. Ensure the area is completely clean before reapplying the tape. Consider using a specialized adhesive spray for extra support.
- Alternative Techniques: Applying a thin layer of specialized wall adhesive or a sealant underneath the washi tape may improve adhesion and minimize the chance of bubbles forming.
FAQ: Common Problems and Solutions
| Problem | Solution |
|---|---|
| Tape not sticking to the wall | Ensure the wall is clean, dry, and smooth. Consider using a specialized wall adhesive or primer for better adhesion. Check the washi tape’s compatibility with the wall type. |
| Bubbles forming under the tape | Press out air pockets with a flat tool immediately. Carefully remove and reapply the affected section, ensuring the area is clean. |
| Tape tearing during application | Apply the tape slowly and smoothly, ensuring even pressure. Use a suitable tape for the surface and avoid stretching the tape excessively. |
| Uneven or wrinkled tape application | Apply the tape in consistent, small sections. Ensure consistent pressure during the application process. |
Inspiration and Examples
A well-designed washi tape wall mural can transform a space, adding personality and visual interest. Drawing inspiration from existing examples is a crucial step in creating your own unique masterpiece. Understanding different styles and techniques will help you develop your own vision and choose the best approach for your project.A successful washi tape mural relies heavily on inspiration.
Observing existing works allows for a deeper understanding of design choices, color palettes, and overall aesthetics. This understanding translates directly to the development of your own unique mural design. Consider how the techniques used in various examples contribute to the overall effect, whether it’s the intricate patterns, bold colors, or delicate details.
Diverse Styles and Designs
Different styles and designs of washi tape wall murals cater to diverse preferences and spaces. This section presents various examples, highlighting the techniques used in each.
- Geometric Patterns: This style often uses a combination of straight lines and geometric shapes to create a visually stimulating and organized pattern. The precision in applying the tape and the careful arrangement of the shapes are crucial. For example, a mural could feature a repeating pattern of squares, triangles, or hexagons in various colors. This approach works well in contemporary or modern settings, adding a touch of sophistication.
- Floral Designs: These murals feature delicate floral motifs, often using a range of washi tape colors to create depth and dimension. Careful placement of individual flowers and leaves, and the use of varying tape thicknesses, is key to achieving a natural, flowing effect. A delicate floral mural would add a touch of elegance and softness to a living room or bedroom.
Consider using a light background color to showcase the tape patterns.
- Abstract Murals: These designs employ a combination of colors, shapes, and textures without following a specific theme or pattern. The beauty of abstract washi tape murals lies in the interplay of colors and forms, and the freedom to experiment with different tape thicknesses and textures. For example, a dynamic mural might use a combination of bold colors, overlapping shapes, and varying tape widths to create a unique visual impact.
This approach is ideal for a creative space like a playroom or an artist’s studio.
- Nature-Inspired Murals: These murals incorporate natural elements such as trees, leaves, or landscapes. The technique involves carefully layering different shades of washi tape to create depth and realism. For example, a mural of a forest scene might utilize different shades of green washi tape to mimic the varied foliage. This type of mural can add a touch of tranquility and serenity to a space.
Detailed Descriptions of Examples
The following descriptions provide insights into the techniques used in specific washi tape mural examples.
| Example | Description | Techniques |
|---|---|---|
| Abstract Geometric | A bold mural using various shades of blue and gray washi tape to create a dynamic abstract pattern. | Precise placement of tape pieces, overlapping techniques for depth, using a variety of tape thicknesses to create visual interest. |
| Floral Landscape | A serene mural depicting a garden with flowers and leaves. | Careful layering of different shades of pink and green washi tape, use of small tape pieces for intricate details, application of tape in a flowing pattern to create a natural look. |
| Nature-Inspired Waterfall | A mural depicting a cascading waterfall, utilizing various shades of blue and green washi tape. | Combination of overlapping tape, gradients of colors for depth, careful placement of tape pieces to simulate water flow. |
Last Recap
In conclusion, crafting a washi tape wall mural is a rewarding experience that blends creativity, meticulous planning, and precise application. By following the steps Artikeld in this guide, you’ll gain the confidence and knowledge to bring your artistic vision to life. Remember to choose your materials carefully, plan your design thoughtfully, and enjoy the process of transforming your walls into a captivating display of your creativity.